Mastering Metal Engraving Machine Techniques: A Comprehensive Guide
Metal engraving is a captivating art form that requires skill, precision, and the right tools. While traditional hand engraving techniques have their charm, modern metal engraving machines have revolutionized the industry, offering efficiency and versatility.
In this comprehensive guide, we will explore the intricacies of metal engraving machine techniques, covering essential aspects such as machine selection, setup, tooling, design transfer, surface treatments, and troubleshooting.
Whether you're a novice seeking to explore this captivating craft or an experienced engraver looking to enhance your skills, this guide will provide valuable insights and practical tips to help you master the art of metal engraving with machines.
Section:1 Choosing the Right Engraving Machine
Section 2: Setting Up Your Engraving Machine
Section 3: Exploring Engraving Tooling Options
Section 4: Design Transfer Techniques
Section 5: Finishing Touches and Surface Treatments
Section 6: Troubleshooting and Maintenance
Section 1: Choosing the Right Engraving Machine
Before diving into the techniques, it is crucial to select the right metal engraving machine. Factors to consider include the type of machine (rotary or laser), size and capabilities, compatibility with different metals, ease of use, and budgetary constraints.
We will explore these factors in detail and provide guidance to help you make an informed decision. Additionally, we will discuss the importance of considering specific project requirements and the role of software compatibility.
-
Machine Type: There are two primary types of metal engraving machines: rotary and laser. Rotary engraving machines utilize rotating cutting tools to remove material from the metal surface, while laser engraving machines use lasers to etch the design onto the metal. Each type has its advantages and applications. Rotary machines are suitable for a wide range of materials and offer versatility in terms of depth and detail. Laser machines, on the other hand, excel at intricate and precise designs, especially for flat surfaces.
-
Size and Capabilities: Consider the size of the work area and the maximum dimensions of the materials you intend to engrave. Ensure that the machine can accommodate your desired project sizes. Additionally, assess the machine's capabilities, such as its ability to engrave different metals, varying depths, and the range of speeds and feeds it offers. These factors will determine the versatility and flexibility of your machine.
-
Compatibility with Different Metals: Ensure that the engraving machine you choose is compatible with the types of metals you plan to work with. Some machines may be better suited for softer metals like aluminium or brass, while others can handle harder materials such as stainless steel or titanium. Check the machine's specifications and capabilities to ensure it can effectively engrave the metals you intend to work with.
-
Ease of Use: Consider the user-friendliness of the machine, especially if you are a beginner or planning to train others to use it. Look for machines with intuitive controls, clear instructions, and user-friendly software interfaces. Ease of use will facilitate a smoother learning curve and improve productivity in the long run.
-
Budgetary Constraints: Set a budget for your engraving machine and consider the overall value it offers. Keep in mind that higher-priced machines often come with advanced features, greater precision, and better durability. However, there are also affordable options available that can deliver satisfactory results for beginners or those with limited budgets. Assess your needs and strike a balance between price and performance.
-
Specific Project Requirements: Take into account the specific requirements of your engraving projects. Are you primarily engraving flat surfaces or complex three-dimensional objects? Will you be engraving large batches or individual custom pieces? Consider the flexibility, speed, and accuracy required for your projects to ensure the machine meets your specific needs.
By carefully considering these factors, you can select an engraving machine that aligns with your goals and provides the capabilities necessary to achieve the desired results. Take the time to research different models, read customer reviews, and consult with experienced engravers to make an informed decision.
Remember, investing in a high-quality engraving machine that suits your needs will not only enhance your engraving capabilities but also save you time, effort, and potential frustrations down the line.
Section 2: Setting Up Your Engraving Machine
Proper setup is essential to ensure optimal performance and accuracy when using a metal engraving machine. This section will cover crucial steps such as machine calibration, tool selection and installation, securing the workpiece, adjusting cutting parameters, and ensuring proper ventilation.
We will provide detailed instructions and tips to help you set up your machine correctly, ensuring a stable foundation for successful engraving.
-
Machine Calibration: Before you start engraving, it is vital to calibrate your machine. Calibration ensures that the machine's movements are precise and accurately correspond to the design dimensions. Follow the manufacturer's instructions to calibrate the machine, which may involve aligning axes, setting the origin point, and adjusting parameters such as step resolution and acceleration.
-
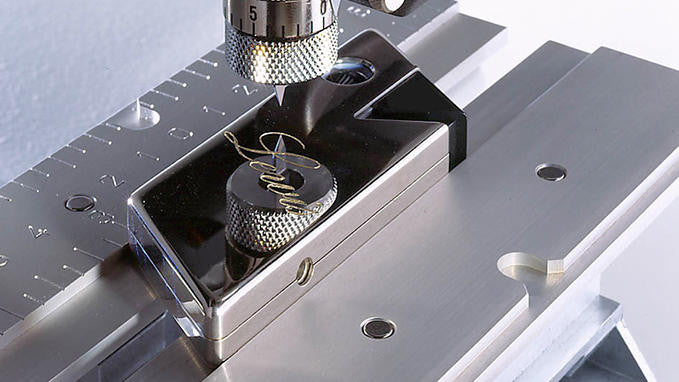
Tool Selection and Installation: Selecting the appropriate engraving tool is key to achieving desired results. Different tools have varying cutting angles, tip shapes, and materials, impacting the depth, clarity, and overall quality of the engravings. Refer to the machine's manual or consult with experienced engravers to determine the most suitable tools for your specific application. Once you have chosen the tools, install them securely following the manufacturer's guidelines to ensure stability during the engraving process.
-
Securing the Workpiece: To prevent movement or vibrations during engraving, it is essential to securely fix the workpiece to the machine's work area. Depending on the machine and the workpiece's size and shape, options may include clamps, vices, or vacuum tables. Ensure that the workpiece is firmly held in place but avoid overtightening, as it may deform the material or affect the engraving process.
-
Adjusting Cutting Parameters: Every metal and engraving project may require specific cutting parameters such as speed, feed rate, and depth per pass. These parameters depend on the material's hardness, the type of engraving tool, and the desired engraving depth. Consult the machine's manual, tool manufacturer recommendations, or gather information from experienced engravers to determine suitable cutting parameters for your specific project. Fine-tuning these parameters can significantly impact the quality and efficiency of your engravings.
-
Ventilation and Safety Precautions: Engraving metal can generate dust, debris, and fumes, so it is crucial to ensure proper ventilation in your workspace. Install appropriate ventilation systems or work in well-ventilated areas to minimize the inhalation of hazardous particles. Additionally, wear appropriate personal protective equipment (PPE), such as safety glasses, gloves, and respiratory protection, to safeguard yourself during the engraving process.
-
Machine Software and Settings: Familiarize yourself with the machine's software interface and settings. Depending on the machine, you may have options to import designs, create toolpaths, adjust engraving parameters, and simulate engraving processes. Take the time to understand these features, as they will enable you to optimize your engraving workflow and achieve desired results.
-
Test Engravings and Fine-Tuning: Before embarking on significant projects, perform test engravings on scrap or sample materials. This allows you to verify the machine's setup, test cutting parameters, and assess the engraving quality. Take note of any adjustments or fine-tuning needed and make necessary changes to achieve the desired outcome.
By following these setup guidelines, you can ensure that your engraving machine is ready for precise, efficient, and safe engraving operations. Proper setup enhances the accuracy of your engravings and minimizes the risk of errors, ensuring consistent and high-quality results in your metal engraving endeavours.
Section 3: Exploring Engraving Tooling Options
The choice of engraving tools greatly impacts the quality and intricacy of your metal engravings. This section will delve into the various types of cutting tools available, including carbide cutters, diamond drag tools, rotary cutters, and more.
We will discuss the differences between these tools, their applications, and recommended usage techniques.
Additionally, we will provide insights into tool maintenance and sharpening to ensure consistent and precise engraving results.
-
Carbide Cutters: Carbide cutters are widely used in metal engraving due to their durability and versatility. These cutters feature sharp, tungsten carbide tips that can withstand the hardness of metals. Carbide cutters are suitable for engraving a wide range of materials, including aluminium, brass, steel, and more. They provide clean cuts, excellent detail reproduction, and can handle both shallow and deep engravings. Carbide cutters come in various tip shapes, such as V-point, square, or round, allowing engravers to achieve different design effects.
-
Diamond Drag Tools: Diamond drag tools, also known as diamond-point or diamond scribe tools, use a small diamond tip to scratch the surface of the metal. These tools are excellent for producing fine, shallow engravings with exceptional detail. Diamond drag tools work well on softer metals like aluminium, copper, and brass. They create crisp, precise lines and can achieve varying line widths by adjusting the tool's angle and pressure. Diamond drag tools are commonly used for producing text, logos, and intricate patterns.
-
Rotary Cutters: Rotary cutters consist of small, spinning cutting wheels or burrs that remove material from the metal surface as they rotate. These cutters offer high-speed engraving and are suitable for larger, shallower engravings. Rotary cutters come in various shapes, including cylindrical, ball, or tapered, providing versatility in design possibilities. They are often used for creating textures, borders, and decorative elements on metal surfaces.
-
Laser Engraving Attachments: For those using laser engraving machines, laser engraving attachments offer a unique set of capabilities. Laser beams vaporize or ablate the metal surface, creating precise and highly detailed engravings. Laser engraving allows for intricate designs, photo engravings, and the ability to work on a wide range of materials, including metals like stainless steel and titanium. Laser engraving attachments provide speed and accuracy, making them ideal for complex and highly detailed engravings.
-
Gravers: Gravers are hand tools used in traditional hand engraving techniques, but they can also be used with some engraving machines. These tools have sharpened metal tips that are pushed or struck with a mallet to remove material from the metal surface. Gravers offer a high level of control, allowing engravers to create precise lines, shading, and delicate details. They are often preferred for artistic, freehand engraving on metals like gold, silver, and copper.
When selecting engraving tools, consider factors such as the desired depth, level of detail, material hardness, and the type of machine you are using. Experiment with different tooling options to determine which ones best suit your engraving style and project requirements. It is also important to maintain and sharpen your engraving tools regularly to ensure optimal performance and longevity.
Remember, each tool requires specific usage techniques to achieve the best results. Practice and experimentation are key to mastering the art of using different engraving tools. Develop a familiarity with each tool's capabilities, learn to control cutting depth and speed, and explore various techniques to enhance your metal engraving skills.
By understanding the strengths and applications of different engraving tooling options, you can expand your artistic possibilities, create intricate designs, and achieve stunning metal engravings that captivate
Section 4: Design Transfer Techniques
Transferring a design onto the metal surface accurately is a critical step in metal engraving. This section will explore different design transfer methods, such as stencils, vinyl masks, computer-aided design (CAD) software, and direct engraving.
We will discuss their advantages, limitations, and the step-by-step process for each technique.
Furthermore, we will address considerations for complex designs, multiple depths, and engraving on irregular surfaces. By mastering design transfer techniques, you can bring your artistic visions to life with remarkable precision.
- Stencils: Stencils are a straightforward and versatile method for transferring designs onto metal surfaces. Create or obtain a stencil of the desired design, which can be made from materials like paper, plastic, or vinyl. Place the stencil on the metal surface and secure it in place. Use a scribe or pencil to trace the design's outlines, transferring the image onto the metal. Stencils are particularly useful for simple designs or repetitive patterns.
- Vinyl Masks: Vinyl masks offer greater flexibility and precision compared to stencils. Using a computer-aided design (CAD) software or a cutting plotter, design and cut the desired pattern or text on adhesive vinyl material. Remove the excess vinyl, leaving the design on the backing sheet. Apply the vinyl mask onto the metal surface, ensuring smooth adhesion. Once in place, use a scribe or knife to trace the design's outlines onto the metal. Vinyl masks allow for intricate designs, curved lines, and precise detailing.
- Computer-Aided Design (CAD) Software: With the advent of technology, many engravers utilize computer-aided design (CAD) software for creating and transferring designs onto metal surfaces. Using specialized engraving software, create or import your design into the software. Configure the design's dimensions, scaling, and alignment as needed. Once ready, send the design to the engraving machine, which will use the software's instructions to engrave the design directly onto the metal. CAD software offers precise control over design elements, allowing for complex patterns, intricate details, and the ability to replicate designs effortlessly.
- Direct Engraving: Direct engraving involves transferring the design onto the metal surface using manual techniques or specialized tools. This method requires excellent hand-eye coordination and engraving skill. Using a sharp scribe or engraving tool, directly trace or freehand the design onto the metal surface. The engraver must possess a good understanding of proportions, depth control, and line quality to accurately reproduce the design. Direct engraving offers a more organic and artistic approach, allowing for creativity and customization.
- Photographic Transfer: For intricate or detailed designs, photographic transfer techniques can be employed. First, obtain a high-resolution printout or transparency of the desired design. Prepare the metal surface by applying a light-sensitive emulsion or photosensitive material. Place the printed or transparent design on top of the emulsion and expose it to UV light. The light will harden the emulsion, creating a stencil-like mask. Remove the unexposed emulsion, leaving the desired design on the metal surface. Photographic transfer techniques offer precise reproduction of complex designs, including photographs and highly detailed graphics.
Section 5: Finishing Touches and Surface Treatments
Mastering various metal engraving techniques is key to achieving exceptional results and unleashing your creative potential.
In this section, we will explore some essential techniques used in metal engraving that will help you create stunning and intricate designs.
-
Line Engraving: Line engraving is the foundation of metal engraving and involves creating lines of varying widths and depths on the metal surface. It is commonly used for text, borders, and outlining elements within a design. To achieve precise lines, hold the engraving tool at a consistent angle and apply steady pressure as you move along the desired path. Control the depth by adjusting the pressure exerted on the tool. Practice creating clean and smooth lines to achieve professional-looking engravings.
-
Stipple Engraving: Stipple engraving involves creating patterns or shading using a series of dots or small marks. This technique adds texture, depth, and visual interest to your engravings. To achieve stipple engravings, use a pointed engraving tool and gently tap or dot the metal surface. Vary the spacing and intensity of the dots to create different shades or patterns. Stipple engraving requires patience and control, as each dot contributes to the overall effect. Experiment with different dot sizes and densities to achieve desired textures and shading effects.
-
Relief Engraving: Relief engraving involves removing material around a design, creating a raised, three-dimensional effect. This technique is often used for decorative elements, logos, or artistic engravings. Begin by outlining the design and then gradually remove material from the surrounding areas using a burin or chisel-like engraving tool. Pay attention to depth control to achieve a consistent and visually appealing relief effect. Relief engraving requires precision and attention to detail, as each cut contributes to the final result.
-
Bevelling: Bevelling is the process of creating slanted or angled edges around a design element. This technique adds dimensionality and visual impact to engravings. To achieve bevelled edges, carefully angle the engraving tool and remove material along the desired lines. Bevelling requires control and consistency to achieve uniform and smooth edges. Experiment with different bevel angles to create depth and enhance the overall appearance of your engravings.
-
Background Removal: Background removal involves selectively removing material from the surrounding areas of a design, creating a contrast between the engraved design and the background. This technique can enhance the visibility and prominence of your engravings. To remove the background, use an appropriate engraving tool and carefully remove material outside of the desired design. Take caution to maintain clean edges and avoid damaging the design itself. Background removal requires patience and precision to achieve a clean and professional-looking result.
-
Inlay Techniques: Inlay techniques involve incorporating different materials or colours into your metal engravings. This adds visual interest and allows for greater design versatility. Common inlay materials include precious metals, gemstones, or contrasting metals. To achieve inlay, create recessed areas within the metal surface using engraving techniques like relief engraving or background removal. Fit the inlay material into the recessed areas, ensuring a secure and flush fit. Inlay techniques require precision and skill in both engraving and fitting the inlay material, but the results can be truly remarkable.
Remember, mastering metal engraving techniques requires practice, patience, and attention to detail. Start with simpler designs and gradually progress to more complex ones as your skills develop.
Experiment with different tools, depths, and techniques to explore the vast creative possibilities that metal engraving offers. Take inspiration from established engravers, study their techniques, and continuously refine your skills through practice and experimentation.
Section 6: Troubleshooting and Maintenance
Metal engraving is a delicate art form that requires proper troubleshooting and maintenance to ensure consistent and high-quality results.
In this section, we will explore common issues that engravers may encounter during the engraving process and provide helpful tips to overcome them.
-
Uneven or Inconsistent Lines: If you notice that your engraved lines appear uneven or inconsistent in depth, there could be several factors contributing to this issue. First, check the sharpness of your engraving tool. Dull tools can lead to inconsistent lines. Ensure that you are applying consistent pressure and maintaining a steady hand motion while engraving. Additionally, double-check the stability of your workpiece and the positioning of your engraving tool. Making adjustments in these areas can help you achieve more even and consistent lines.
-
Jagged or Rough Edges: Jagged or rough edges on your engravings can be frustrating, but there are steps you can take to address this issue. Start by examining the sharpness of your engraving tool. A dull tool can cause rough edges. Consider sharpening or replacing the tool as needed. Pay attention to your hand motion and the speed at which you are engraving. Smooth, fluid movements and consistent pressure can help produce cleaner edges. Finally, ensure that your workpiece is properly secured, as any movement during engraving can result in rough edges.
-
Clogging or Build-up on Engraving Tools: Over time, engraving tools can accumulate debris or build-up that affects their performance. It is crucial to regularly clean and maintain your engraving tools. Follow the manufacturer's instructions for cleaning and lubricating the tools. Use appropriate cleaning solutions and brushes to remove any debris or residue. Keeping your tools clean and well-maintained will ensure optimal performance and longevity.
-
Workpiece Surface Damage: During the engraving process, it is possible to inadvertently damage the surface of the workpiece. To prevent this, take extra care when positioning and securing the workpiece. Use protective layers or masking tape to shield areas that should not be engraved. Practice control over the depth and pressure applied during engraving to avoid excessive damage to the workpiece surface.
-
Maintenance of Engraving Equipment: In addition to maintaining your engraving tools, it is essential to regularly inspect and maintain your engraving equipment. Clean the engraving machine, removing any dust or debris that may have accumulated. Check and replace any worn or damaged parts as needed. Lubricate moving components according to the manufacturer's instructions. Proper maintenance ensures the longevity and optimal performance of your engraving equipment.
-
Continuous Skill Development: To troubleshoot effectively and overcome engraving challenges, continuous skill development is vital. Attend workshops, engage in online forums, and seek guidance from experienced engravers. Learning from others' experiences and expertise can help you develop effective solutions to common engraving issues. Continuously refine your techniques through practice and experimentation, and stay updated on the latest advancements in engraving technology and methods.
By addressing these common troubleshooting and maintenance concerns, you can enhance the quality of your engravings and enjoy a smoother engraving process. Remember to remain patient and persistent as you navigate through challenges, and always strive for continuous improvement in your engraving skills and techniques.
Conclusion
Metal engraving is a captivating art form that allows you to transform ordinary pieces of metal into works of art. Through the use of engraving tools, design transfer techniques, and various engraving techniques, you can create stunning and intricate designs that showcase your creativity and craftsmanship.
By understanding the different engraving tooling options, such as carbide cutters, diamond drag tools, rotary cutters, laser engraving attachments, and gravers, you can choose the right tools for your specific project and achieve precise and visually appealing engravings.
Design transfer techniques like stencils, vinyl masks, CAD software, direct engraving, transfer papers, and photographic transfer provide you with a range of options to accurately transfer your design onto the metal surface. Consider the complexity of your design and the level of detail required when selecting a design transfer method.
Learning essential engraving techniques like line engraving, stipple engraving, relief engraving, bevelling, background removal, and inlay techniques will help you achieve professional-looking results. Each technique requires practice, patience, and attention to detail, but mastering them will enable you to create engravings with depth, texture, and visual impact.
As you embark on your metal engraving journey, remember to continuously refine your skills through practice and experimentation. Take inspiration from established engravers, study their techniques, and develop your unique style. The more you explore and push the boundaries of metal engraving, the more you will unlock its limitless creative possibilities.
So, pick up your engraving tools, unleash your imagination, and let the metal become your canvas. With dedication and passion, you can create metal engravings that leave a lasting impression and stand as a testament to your artistic prowess.
Enjoy the process, embrace the challenges, and watch as your metal engravings come to life with beauty and precision. Happy engraving!